利用 debootstrap 构建 Debian/Ubuntu 文件系统
简介
构建根文件系统常见的方法有 busybox, buildroot, yocto 等, 对应的资料网络上都很丰富,缺点是功能过于简单或者步骤过于复杂。采用 Ubuntu/Debian 文件系统是个不错的选择,通过 apt 能够复用 ubuntu/debian 软件生态,自动解决软件依赖。debootstrap 是一个用来构建 Debian base 系统(根文件系统)的工具,通过 debootstrap 可以很轻松地构建出一个 Debian/Ubuntu 文件系统。
准备工作
- 安装 qemu-system-aarch64
- 安装 qemu-user-static
- 安装 debootstrap
- 正确配置并编译好的内核镜像
文件系统构建
首先创建一个 ext4 文件系统并挂载,512 MiB 大小就足够了。
1 | |
debootstrap 简要用法如下,详细用法可查看 man debootstrap 。
1 | |
- suite 是指版本代号,如 debian 的 buster 或者 ubuntu 的 jammy,填第一个单词的小写就行了
- target 是指目标架构,如 arm64
- mirror 是指构建 Debian/Ubuntu 的镜像源
这里我们用华为的镜像源构建 Debian buster 版本 arm64 系统:
1 | |
同样,如果想构建 Ubuntu 系统则修改 suite 和 mirror 即可:
1 | |
执行结束后就会在我们创建的 tmp-rootfs 目录生成所需要的 Debian 系统。
文件系统配置
文件系统构建完成后,我们还需要配置网络、安装软件,配置用户等。
首先拷贝之前安装的 qemu-static 工具到我们的文件系统,因为我们这里的 host 是 x86 架构,通过 host 配置系统时需要运行文件系统内的 arm64 架构的程序,需要 qemu-aarch64-static 对进行用户模式模拟。
1 | |
之后 chroot 到文件系统:
1 | |
按照个人需求创建用户和修改密码:
1 | |
同样按照个人需求安装软件:
1 | |
最后还需要配置网络,QMEU 网络配置详情查看 QEMU Networking,这里配置最简单的用户模式网卡。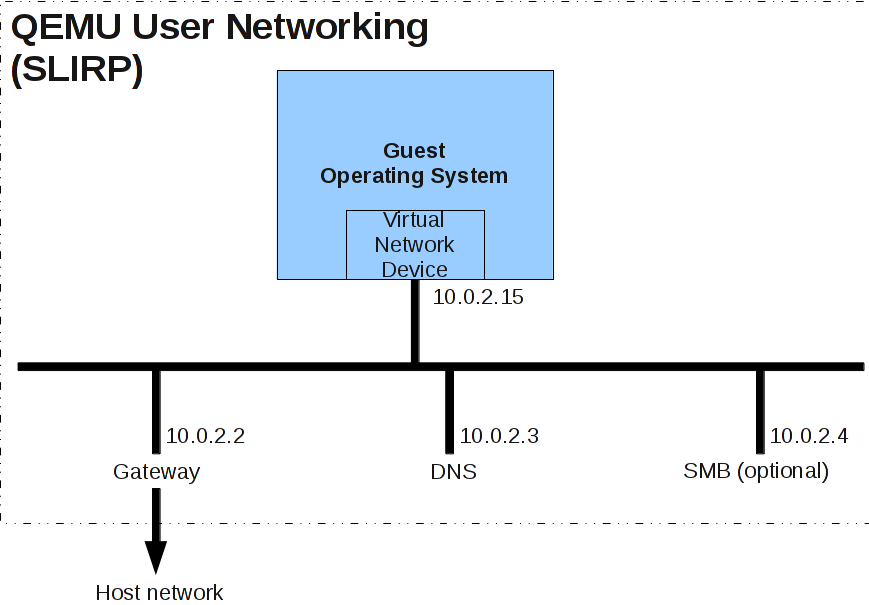
同时具体配置方法和系统也相关,以 Debian buster 为例,网络是由 /etc/network/interfaces 文件配置的,将以下内容写入该文件。
1 | |
对于 QEMU 用户模式网卡,需要配置 DNS 服务器为 10.0.2.3,将以下内容写入 /etc/resolv.conf。注意:此时 DNS 服务器地址和 host 不一样了,因此在 host 上 chroot 后安装软件会失败。
1 | |
最后 umount 文件系统就大功告成了 :)
1 | |
运行 QEMU
通过如下命令启动 QEMU 环境
1 | |
遇到的问题
Ubuntu jammy 网络异常
使用 Ubuntu jammy 发现通过 netplan 配置网络不成功,每次启动网卡没有 up。
1 | |
怀疑和 NetworkManager.service 没有起来相关,同时系统 systemd-resolved.service 会自动生成错误的 DNS 地址(和 host 的相同),目前解决办法只能手动配置 DNS ,网卡和路由。
1 | |
更新:安装 nmcli 后问题解决(Ubuntu 太坑了,这种核心软件没有提前安装好),使用方法可以看看这篇文章 How to Install and Configure Nmcli
1 | |
然后用 netplan 配置网卡
1 | |
1 | |
Todo
- 完善 netplan 方式配置网卡
- 完善 nmcli 使用方法
- 写一篇文章整理 QEMU 网卡配置,包括tap/tun 模式网卡配置
- QEMU 使用其他模式网卡时 debian/ubuntu 网络怎么配置
- Linux kernel tap/tun 原理分析
- 将构建过程整理成脚本,提交到 qemu-vm 仓库